Đặc tả OpenAPI là một định dạng mô tả không phụ thuộc ngôn ngữ (language-agnostic), dùng để mô tả các RESTful API. Nest cung cấp một module riêng cho phép bạn tạo ra đặc tả này bằng cách tận dụng decorator.
Ghi chú người dịch Nếu bạn từng dùng swaggo bên Go hay l5-swagger bên Laravel, ý tưởng ở đây giống nhau: bạn gắn metadata (qua decorator ở đây, thay vì comment annotation) lên code, rồi một thư viện đọc metadata đó để sinh ra file JSON/YAML tuân theo chuẩn OpenAPI. Điểm khác là Nest tận dụng reflect-metadata của TypeScript nên phần lớn thông tin type được suy ra tự động, không cần viết tay như annotation comment.
Cài đặt
Để bắt đầu, trước tiên chúng ta cài đặt dependency cần thiết.
$ npm install --save @nestjs/swaggerCảnh báo Khi dùng fastify, bạn cũng cần cài @fastify/static:
$ npm install --save @fastify/static
Khởi tạo (Bootstrap)
Sau khi hoàn tất cài đặt, mở file main.ts và khởi tạo Swagger bằng class SwaggerModule:
import { NestFactory } from '@nestjs/core';
import { SwaggerModule, DocumentBuilder } from '@nestjs/swagger';
import { AppModule } from './app.module.js';

async function bootstrap() {
  const app = await NestFactory.create(AppModule);

  const config = new DocumentBuilder()
    .setTitle('Cats example')
    .setDescription('The cats API description')
    .setVersion('1.0')
    .addTag('cats')
    .build();
  const documentFactory = () => SwaggerModule.createDocument(app, config);
  SwaggerModule.setup('api', app, documentFactory);

  await app.listen(process.env.PORT ?? 3000);
}
await bootstrap();
Gợi ý Factory method SwaggerModule.createDocument() được dùng riêng để tạo document Swagger khi bạn yêu cầu nó. Cách làm này giúp tiết kiệm thời gian khởi tạo (initialization), và document tạo ra là một object có thể serialize được, tuân theo đặc tả OpenAPI Document. Thay vì phục vụ document qua HTTP, bạn cũng có thể lưu nó thành file JSON hoặc YAML và dùng theo nhiều cách khác.
Cảnh báo Nếu bạn gọi createDocument() ngay lập tức (eagerly, tức không đặt trong factory function như ví dụ trên), hãy đảm bảo app.enableVersioning() chạy trước đó — nếu không, paths được tạo ra sẽ thiếu tiền tố version. Kiểu factory pattern không bị ảnh hưởng vì document chỉ được build khi nó được yêu cầu lần đầu.
DocumentBuilder giúp cấu trúc một document nền tuân theo đặc tả OpenAPI. Nó cung cấp nhiều method cho phép bạn thiết lập các thuộc tính như title, description, version. Để tạo ra một document đầy đủ (với tất cả HTTP route được định nghĩa), chúng ta dùng method createDocument() của class SwaggerModule. Method này nhận hai tham số: một instance ứng dụng và một object tùy chọn Swagger. Ngoài ra, chúng ta có thể cung cấp tham số thứ ba, thuộc kiểu SwaggerDocumentOptions. Xem thêm ở phần Document options.
Sau khi tạo document, chúng ta có thể gọi method setup(). Method này nhận:
- Đường dẫn để mount Swagger UI
- Một instance ứng dụng
- Object document đã tạo ở trên
- Tham số cấu hình tùy chọn (đọc thêm ở đây)
Bây giờ bạn có thể chạy lệnh sau để khởi động HTTP server:
$ npm run startTrong khi ứng dụng đang chạy, mở browser và truy cập http://localhost:3000/api. Bạn sẽ thấy Swagger UI.
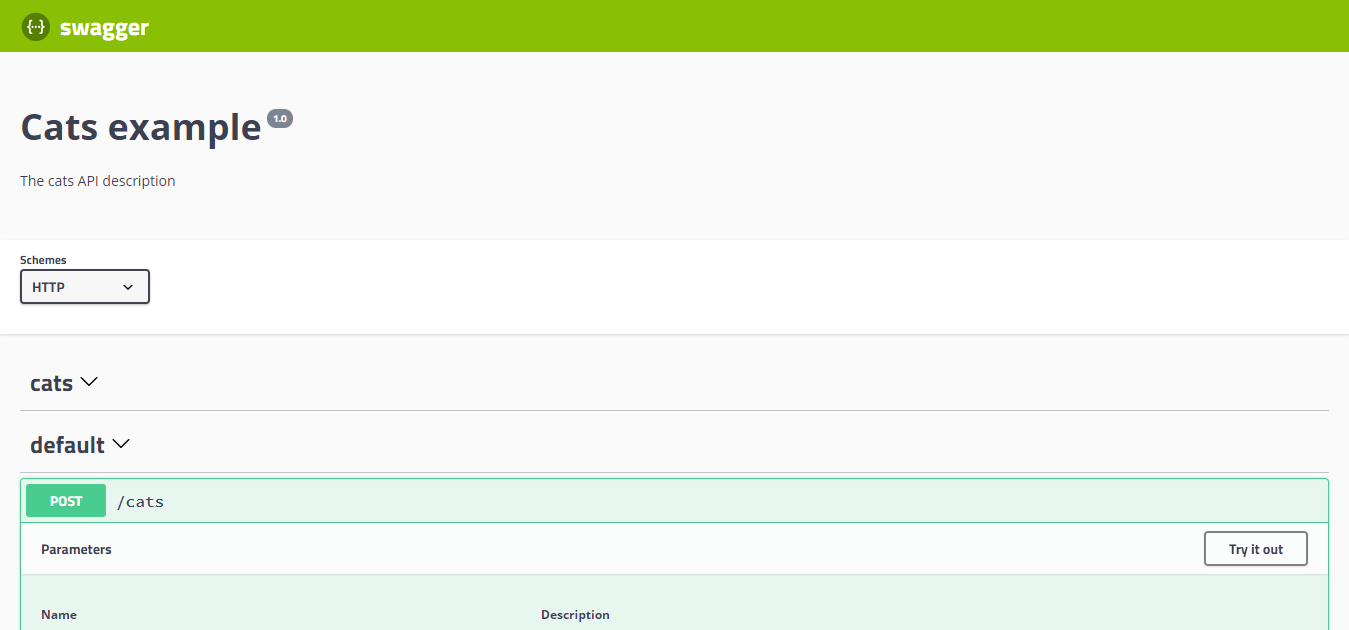
Như bạn thấy, SwaggerModule tự động phản chiếu (reflect) tất cả endpoint của bạn.
Gợi ý Để tạo và tải xuống file Swagger JSON, truy cập http://localhost:3000/api-json (giả sử tài liệu Swagger của bạn nằm ở http://localhost:3000/api).
Bạn cũng có thể expose nó ở một route tùy chọn, chỉ dùng method setup từ @nestjs/swagger, như sau:
SwaggerModule.setup('swagger', app, documentFactory, {
  jsonDocumentUrl: 'swagger/json',
});
Cách này sẽ expose nó tại http://localhost:3000/swagger/json
Cảnh báo Khi dùng fastify và helmet, có thể xảy ra vấn đề với CSP. Để giải quyết xung đột này, cấu hình CSP như dưới đây:
app.register(helmet, {
  contentSecurityPolicy: {
    directives: {
      defaultSrc: [`'self'`],
      styleSrc: [`'self'`, `'unsafe-inline'`],
      imgSrc: [`'self'`, 'data:', 'validator.swagger.io'],
      scriptSrc: [`'self'`, `https:`, `'unsafe-inline'`],
    },
  },
});

// Nếu bạn không dùng CSP, có thể dùng cách này:
app.register(helmet, {
  contentSecurityPolicy: false,
});
Tùy chọn cho Document (Document options)
Khi tạo document, bạn có thể cung cấp thêm một số tùy chọn để tinh chỉnh hành vi của thư viện. Các tùy chọn này thuộc kiểu SwaggerDocumentOptions, có thể gồm:
export interface SwaggerDocumentOptions {
  /**
   * List of modules to include in the specification
   */
  include?: Function[];

  /**
   * Additional, extra models that should be inspected and included in the specification
   */
  extraModels?: Function[];

  /**
   * If `true`, swagger will ignore the global prefix set through `setGlobalPrefix()` method
   */
  ignoreGlobalPrefix?: boolean;

  /**
   * If `true`, swagger will also load routes from the modules imported by `include` modules
   */
  deepScanRoutes?: boolean;

  /**
   * Custom operationIdFactory that will be used to generate the `operationId`
   * based on the `controllerKey`, `methodKey`, and version.
   * @default () => controllerKey_methodKey_version
   */
  operationIdFactory?: OperationIdFactory;

  /**
   * Custom linkNameFactory that will be used to generate the name of links
   * in the `links` field of responses
   *
   * @see [Link objects](https://swagger.io/docs/specification/links/)
   *
   * @default () => `${controllerKey}_${methodKey}_from_${fieldKey}`
   */
  linkNameFactory?: (
    controllerKey: string,
    methodKey: string,
    fieldKey: string
  ) => string;

  /*
   * Generate tags automatically based on the controller name.
   * If `false`, you must use the `@ApiTags()` decorator to define tags.
   * Otherwise, the controller name without the suffix `Controller` will be used.
   * @default true
   */
  autoTagControllers?: boolean;
}
Ví dụ, nếu bạn muốn thư viện tạo ra tên operation dạng createUser thay vì UsersController_createUser, bạn có thể thiết lập như sau:
const options: SwaggerDocumentOptions =  {
  operationIdFactory: (
    controllerKey: string,
    methodKey: string
  ) => methodKey
};
const documentFactory = () => SwaggerModule.createDocument(app, config, options);
Standard Schema (Zod, Valibot)
Các decorator route parameter của Nest chấp nhận một schema tương thích Standard Schema qua tùy chọn schema của chúng (xem chương Controllers):
import { z } from 'zod';

const createCatSchema = z.object({
  name: z.string(),
  age: z.number().int().positive(),
  breed: z.string(),
});

@Controller('cats')
export class CatsController {
  @Post()
  create(@Body({ schema: createCatSchema }) createCatDto: CreateCatDto) {
    return this.catsService.create(createCatDto);
  }
}
Module Swagger sẽ nhận diện các schema này và chuyển chúng thành request body và parameter trong document được tạo ra.
Ghi chú người dịch Nếu bạn quen với Express, hãy nghĩ Standard Schema như một “giao diện chung” mà nhiều thư viện validate (Zod, Valibot, và các thư viện khác) cùng cam kết tuân theo — tương tự cách nhiều thư viện HTTP đều implement middleware theo signature (req, res, next). Nhờ vậy, Nest không cần biết bạn dùng Zod hay Valibot cụ thể, chỉ cần thư viện đó tuân theo chuẩn Standard Schema là inject/đọc metadata được.
Các thư viện không cần cấu hình
Nếu thư viện validate của bạn implement extension Standard JSON Schema — nghĩa là schema của nó expose ~standard.jsonSchema — Nest sẽ tự động chuyển đổi, không cần cấu hình gì thêm. Nó yêu cầu target openapi-3.0 và dùng biến thể input hoặc output tùy theo schema đó mô tả request hay response.
Cung cấp một converter
Với các thư viện không expose extension đó, hãy cung cấp một standardSchemaConverter trong SwaggerDocumentOptions. Nó nhận schema thô cùng với schemaType đang được tạo, và trả về schema OpenAPI đã chuyển đổi:
standardSchemaConverter?: (
  schema: unknown,
  options: { schemaType: 'input' | 'output' },
) => { schema: unknown; components?: Record<string, any> } | undefined;
Trả về undefined báo cho Nest biết converter này không xử lý được schema này, nên nó sẽ fallback về cách chuyển đổi mặc định như đã mô tả trên. Đây chính là điều giúp bạn có thể hỗ trợ nhiều thư viện an toàn chỉ từ một converter.
Với Zod, dùng zod-openapi:
$ npm i --save-dev zod-openapiimport { SwaggerDocumentOptions } from '@nestjs/swagger';
import { createSchema } from 'zod-openapi';
const documentOptions: SwaggerDocumentOptions = {
standardSchemaConverter: (schema, { schemaType }) => {
const converted = createSchema(schema as never, {
io: schemaType,
openapiVersion: '3.0.0',
});
return { schema: converted.schema, components: converted.components };
},
};
const documentFactory = () =>
SwaggerModule.createDocument(app, config, documentOptions);Với Valibot, dùng @valibot/to-json-schema:
$ npm i --save-dev @valibot/to-json-schemaimport { toJsonSchema } from '@valibot/to-json-schema';
const documentOptions: SwaggerDocumentOptions = {
standardSchemaConverter: (schema, { schemaType }) => ({
schema: toJsonSchema(schema as never, {
target: 'openapi-3.0',
typeMode: schemaType,
}),
}),
};Chú ý sự khác biệt giữa hai cách trên: createSchema() có thể hoist (đưa lên cấp cao hơn) các định nghĩa tái sử dụng được, nên kết quả của nó mang theo một map components mà bạn truyền qua và Nest sẽ merge vào phần components chung của document. toJsonSchema() trả về một schema tự chứa (self-contained) duy nhất, nên components chỉ đơn giản được bỏ qua.
Hỗ trợ nhiều thư viện cùng lúc
Vì converter nhận schema dưới dạng unknown, bạn có thể rẽ nhánh (branch) theo vendor của schema và hỗ trợ nhiều hơn một thư viện trong cùng ứng dụng. Mỗi Standard Schema đều expose thông tin này tại ~standard.vendor:
import { toJsonSchema } from '@valibot/to-json-schema';
import { createSchema } from 'zod-openapi';

function hasVendor(schema: unknown, vendor: string) {
  return (
    !!schema &&
    typeof schema === 'object' &&
    (schema as { '~standard'?: { vendor?: string } })['~standard']?.vendor ===
      vendor
  );
}

const documentOptions: SwaggerDocumentOptions = {
  standardSchemaConverter: (schema, { schemaType }) => {
    if (hasVendor(schema, 'zod')) {
      const converted = createSchema(schema as never, {
        io: schemaType,
        openapiVersion: '3.0.0',
      });
      return { schema: converted.schema, components: converted.components };
    }

    if (hasVendor(schema, 'valibot')) {
      return {
        schema: toJsonSchema(schema as never, {
          target: 'openapi-3.0',
          typeMode: schemaType,
        }),
      };
    }

    // Not handled here - let Nest fall back to native conversion
    return undefined;
  },
};
Cảnh báo Luôn thu hẹp (narrow) theo vendor trước khi gọi một converter dành riêng cho một thư viện cụ thể. Truyền một schema Valibot vào createSchema() (hoặc ngược lại) sẽ throw lỗi ngay tại thời điểm tạo document, thay vì thất bại một cách “graceful”.
Gợi ý schemaType quan trọng khi schema của bạn thực hiện phép biến đổi (transformation): hình dạng input là những gì client gửi lên, còn hình dạng output là những gì handler của bạn nhận được sau khi parse. Nest sẽ hỏi giá trị phù hợp tùy theo vị trí đang được document hóa, vì vậy hãy truyền thẳng giá trị đó cho converter của bạn thay vì hard-code cứng một giá trị.
Tùy chọn thiết lập (Setup options)
Bạn có thể cấu hình Swagger UI bằng cách truyền một object tùy chọn tuân theo interface SwaggerCustomOptions, làm tham số thứ tư của method SwaggerModule#setup.
export interface SwaggerCustomOptions {
  /**
   * If `true`, Swagger resources paths will be prefixed by the global prefix set through `setGlobalPrefix()`.
   * Default: `false`.
   * @see https://docs.nestjs.com/faq/global-prefix
   */
  useGlobalPrefix?: boolean;

  /**
   * If `false`, the Swagger UI will not be served. Only API definitions (JSON and YAML)
   * will be accessible (on `/{path}-json` and `/{path}-yaml`). To fully disable both the Swagger UI and API definitions, use `raw: false`.
   * Default: `true`.
   * @deprecated Use `ui` instead.
   */
  swaggerUiEnabled?: boolean;

  /**
   * If `false`, the Swagger UI will not be served. Only API definitions (JSON and YAML)
   * will be accessible (on `/{path}-json` and `/{path}-yaml`). To fully disable both the Swagger UI and API definitions, use `raw: false`.
   * Default: `true`.
   */
  ui?: boolean;

  /**
   * If `true`, raw definitions for all formats will be served.
   * Alternatively, you can pass an array to specify the formats to be served, e.g., `raw: ['json']` to serve only JSON definitions.
   * If omitted or set to an empty array, no definitions (JSON or YAML) will be served.
   * Use this option to control the availability of Swagger-related endpoints.
   * Default: `true`.
   */
  raw?: boolean | Array<'json' | 'yaml'>;

  /**
   * Url point the API definition to load in Swagger UI.
   */
  swaggerUrl?: string;

  /**
   * Path of the JSON API definition to serve.
   * Default: `<path>-json`.
   */
  jsonDocumentUrl?: string;

  /**
   * Path of the YAML API definition to serve.
   * Default: `<path>-yaml`.
   */
  yamlDocumentUrl?: string;

  /**
   * Hook allowing to alter the OpenAPI document before being served.
   * It's called after the document is generated and before it is served as JSON & YAML.
   */
  patchDocumentOnRequest?: <TRequest = any, TResponse = any>(
    req: TRequest,
    res: TResponse,
    document: OpenAPIObject
  ) => OpenAPIObject;

  /**
   * If `true`, the selector of OpenAPI definitions is displayed in the Swagger UI interface.
   * Default: `false`.
   */
  explorer?: boolean;

  /**
   * Additional Swagger UI options
   */
  swaggerOptions?: SwaggerUiOptions;

  /**
   * Custom CSS styles to inject in Swagger UI page.
   */
  customCss?: string;

  /**
   * URL(s) of a custom CSS stylesheet to load in Swagger UI page.
   */
  customCssUrl?: string | string[];

  /**
   * URL(s) of custom JavaScript files to load in Swagger UI page.
   */
  customJs?: string | string[];

  /**
   * Custom JavaScript scripts to load in Swagger UI page.
   */
  customJsStr?: string | string[];

  /**
   * Custom favicon for Swagger UI page.
   */
  customfavIcon?: string;

  /**
   * Custom title for Swagger UI page.
   */
  customSiteTitle?: string;

  /**
   * File system path (ex: ./node_modules/swagger-ui-dist) containing static Swagger UI assets.
   */
  customSwaggerUiPath?: string;

  /**
   * @deprecated This property has no effect.
   */
  validatorUrl?: string;

  /**
   * @deprecated This property has no effect.
   */
  url?: string;

  /**
   * @deprecated This property has no effect.
   */
  urls?: Record<'url' | 'name', string>[];
}
Gợi ý ui và raw là hai tùy chọn độc lập với nhau. Tắt Swagger UI (ui: false) không làm tắt các API definition (JSON/YAML). Ngược lại, tắt API definition (raw: []) không làm tắt Swagger UI.
Ví dụ, cấu hình sau sẽ tắt Swagger UI nhưng vẫn cho phép truy cập API definition:
const options: SwaggerCustomOptions = {
  ui: false, // Swagger UI is disabled
  raw: ['json'], // JSON API definition is still accessible (YAML is disabled)
};
SwaggerModule.setup('api', app, options);
Trong trường hợp này, http://localhost:3000/api-json vẫn truy cập được, nhưng http://localhost:3000/api (Swagger UI) thì không.
Ví dụ
Một ví dụ hoạt động đầy đủ có sẵn tại đây.